We may earn revenue from the products available on this page and participate in affiliate programs. Learn More ›
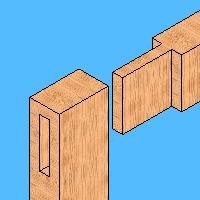
Mortise and tenon joints are the preferred style of joint for furniture and cabinetwork. It’s strong, durable, and little affected by the expansion or contraction of wooden members as a result of temperature and humidity changes. When shaped properly, mortise and tenon joints can even be decorative elements in the finished appearance of a piece.
Making a mortise and tenon joint may be a daunting prospect to the novice woodworker, but with the proper tools, shaping the parts is a quite straightforward process.
Laying Out the Joint. As any experienced cabinetmaker will tell you, proper layout is just as important as the cutting and shaping to follow. A perfectly shaped tenon that’s the wrong size or shape is no accomplishment at all.
The tenon should be between one third and one half of the thickness of the stock from which it is made.
Set your mortise gauge to the chosen tenon thickness, positioning the points so that it will score a pair of lines that distance apart. Then set the block on the gauge so that the lines will be drawn equidistant from the sides of the stock. Mark off the shoulder lines, too, where the stock is to be trimmed above and below the tongue.
Cutting the Tenon. Your back saw can do the job. A shaper or router can be used, too, as can a dado head on a table or radial-arm saw.
In each case, set the blade height separately for the shoulder and face cuts. On the table saw, position the fence so that the distance from the opposite side of the blade to the fence matches the desired length of the tenon.
Cutting the Mortise. The mortise depth should be roughly three times the thickness of the tenon. It can be cut in several ways, among them the traditional approach of using sturdy mortising chisels and a mallet to chisel out the hole by hand. Another option is to use a Forstner or auger bit on your drill or drill brace to start the mortise, then clean and square it with a chisel. You can also use a router; a plunge router is especially useful for mortising.
A much easier method is to use a mortising attachment on your drill press. The device consists of a yoke that clamps the attachment just above the chuck onto the quill (the main stationary shaft of the drill press, within which the spindle turns). At the bottom, the yoke is fitted with a hollow, square-cornered chisel, within which a bit turns. Different sizes of chisels are sold, with matching bits.
When using the mortise attachment, the drill press is operated in much the same way as when it performs ordinary drilling tasks. The spinning bit will do most of the cutting, but the chisel squares off the corners around the hole, producing the shouldered mortise hole.
Make sure the workpiece is properly secured to the table, perhaps with a clamp or a fence or both. In cutting accurate mortises, it is essential that the sides of the chisel be square to the stock. Don’t force the drill: Let it establish a rate of cutting that doesn’t cause the bit to bind in the wood.
Fastening the Joint. Glue is often used to connect mortise and tenon joints, as are dowels driven through the joint. A combination of both is the strongest.
Before applying the glue, clamp the joint together dry to be sure the fit is just right. Drill out the holes for the pins or dowels, disassemble, and apply the glue. Clamp the pieces together, and insert the dowels, leaving them protruding from both sides of the joint. Scrape off any visible excess glue from the surface of the wood being joined.
After the glue has set, remove the clamps and cut off the dowels, using a sharp chisel or a flush saw.


